Monday, March 14, 2016

Betsy's Scrapbag

Today is the first official release day of my new book, Betsy's Scrapbag! It's now on our website, and we have a lot of work to do to get it out and about to your favorite quilt shops.

The first of my Scrapbag Girl TM series began with Annie's Scrapbag, a pattern book of quilts and projects inspired by my fictional seamstress, Annie, a girl living in the early homesteading days of the American frontier.

Annie's Scrapbag
Book 2, Betsy's Scrapbag, follows with quilts and projects inspired by the American Revolution, and Betsy's story of her family's role in the fight for American independence.  And just as in Annie's Scrapbag, Betsy's Scrapbag includes FULL size applique placement diagrams for all of the projects, including the wool applique projects. No drafting on your part needed - whew!

Betsy's Scrapbag

Just like in Annie's Scrapbag, Betsy's Scrapbag includes patterns for quilts, wool applique, and this time a punch needle project, Lady Liberty, one of my favorites! Lady Liberty is made primarily with Valdani 3-ply floss, with the addition of DMC embroidery floss. I also have instructions for my easy method for finishing punchneedle, that "stiffens" it for hanging or applying to a platform, such as a box, or basket, but it's archival, meaning no glues are used.

Lady Liberty

Autumn Stars is one of the five quilts in the book, and is the largest quilt, - a queen size 89" x 89". 

Autumn Stars

There are 10 projects in all, with four wool applique projects, one of which is the Liberty pillow, appliqued using my favorite Aurifil Lana wool threads, which you can also find on our website:


Liberty pillow

To celebrate it's release, I'm having a giveaway for one copy of Betsy's Scrapbag! Just follow the directions in the Rafflecopter box below.


a Rafflecopter giveaway

Good luck, and I hope you find Betsy's Scrapbag soon at a quilt shop near you! I will announce the winner of the giveaway on Monday, March 21st!

Until then,

Martha 

Sunday, February 7, 2016

A Prairie Journal fabric collection, Part Two - The Strippy Vine Print

Applique for Beginners and Beyond

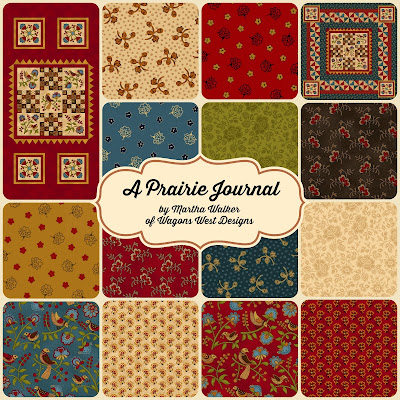
 One morning while I was working on my A Prairie Journal line for Henry Glass & Co., I was thinking about applique. I designed the main panel of the line for those quilters who want instant gratification - and maybe those who will never try their hand at applique. With the Prairie Journal panel they can make a small quilt that will give them that look. Here is my free quilt pattern that incorporates the panel pieces and easy piecing ... a cute little 40" x 40" quilt! (If you click on the image, it will take you straight to the free pattern download).

A Prairie Journal quilt
That morning I was thinking about the quilters who DO want to try applique, but are just afraid to get started. And in particular, I was thinking about vines... beautiful vines in the border of a quilt are so striking. But the marking of the vine border can be intimidating, and patterns don't always provide full scale diagrams. So, I'm sure some quilters look at the instructions and say "Maybe not".

I remember that fear well. In 1999 I designed a border to surround a pieced quilt center. I had never before appliqued a vine border at the time. It was a fairly involved design, and it took me awhile to overcome the fear and take the plunge. Below is a portion of my first appliqued border with vine.

Detail, "Summer Cottages" 2000

But I wanted there to be an easier way for the beginner. So I designed this print as a part of the A Prairie Journal line. I call it The Strippy Vine Print:

A Prairie Journal 9919-44
I designed the print as a kind of blank canvas for the applique beginner or student. The printed vine is your template to add shapes such as flowers, leaves, berries, birds, etc.

Here is the paper version of the Strippy Vine Print that I used at my Quilt Market Schoolhouse to illustrate the "Before" and "After" of adding appliques to the yardage:


The printed vine is also meant to be the placement guide for applying the bias vine after your shapes are added. There are several methods you can use to make bias vines. The printed vine on The Strippy Vine print is 3/8" wide. In a previous blog post I explain how to make bias vines using pressing bars. If you are using the pressing bar method, cut your bias strips 1 1/4" wide x the length you will need to cover your vine. To review my pressing bar tutorial CLICK HERE.

Another way to make bias vines is to use a bias tape maker.  Cut your strips 3/4" wide when using this method. Below I am using a Clover 3/8" bias tape maker to press under the edges of the strip:


If you don't have a bias tape maker handy, you can make one yourself. Cut a 3/8" slit in a piece of thin cardboard or chipboard. Finger press the edges of one end of your 3/4" wide fabric strip to get started, so that the raw edges meet in the center.Insert through the slit and begin pulling the strip through the slit, pressing the edges as you go:


Add your appliques and stems first to the vine, using any applique method you like:


Then place your vine over the printed vine to cover your stems:


I have designed four free to use patterns using The Strippy Vine Print that you can find on the Henry Glass & Co. website. Click on the picture below to take you to the page.
http://www.henryglassfabrics.com/project/prairie-journal-quilt-2/
The Strippy Vine Print can also be used for a horizontal strip quilt. Here is another of the patterns I designed for use with the print that is a free download on the Henry Glass website. 

Folk Art Strippy
You can even cut apart the borders from The Strippy Vine Print to add a touch of applique to any project. There are thirteen coordinates in the A Prairie Journal line and here are a few of the coordinates that look particularly good with The Strippy Vine Print:
http://www.henryglassfabrics.com/collection/prairie-journal/

I can't wait to get the full yardage in June and begin playing with The Strippy Vine Print!

Until next time!

Martha

Thursday, January 14, 2016

A Prairie Journal - My first strike-offs arrive!

My first set of strike-offs for my upcoming new fabric line for Henry Glass & Co., "A Prairie Journal", arrived just a few hours ago! Take a look!

A Prairie Journal strike-offs

They are looking good! Be sure to ask your local quilt shop to carry the line, which ships this summer, June 2016. The small mock applique square is just a small portion of the panel which will look like this:

A Prairie Journal main panel

It was just about a year ago that I was painting the panel - the artists at Henry Glass did an amazing job of translating my original artwork for the fabric!

painting in progress for the A Prairie Journal main panel
Below are pictured most of the prints in the line, and the image in the upper right hand corner is a quilt I designed for use with the panel. The pattern for the quilt and two more free to use patterns can be found on the Henry Glass & Co. website. Just click on the image and it will take you there!

http://www.henryglassfabrics.com/collection/prairie-journal/
A Prairie Journal

I just love the rich brick reds and teal blues, and I couldn't be happier to have included a really great cheddar orange - a color that can be hard time to find and can be oh-so versatile in quilt making. The deep brown is another must have.

I have more to share about the A Prairie Journal line, but I'll save that for another day!

Until next time!

Martha

Thursday, December 24, 2015

Merry Christmas 2015

The past few months have found me doing more writing than sewing. I've been diligently working on writing instructions and making diagrams for my upcoming book, and writing class plans and supply lists for classes. 

Of course, there's Christmas, and I love to decorate, especially with trees! Enjoy the photos!


Wishing you a Merry Christmas and see you back here in 2016!

Until next time,

Martha

Friday, October 30, 2015

International Quilt Market 2015 Houston

I'm back from International Quilt Market in Houston, and finally catching my breath a bit from travel, filling orders, and just plain doing laundry!

Despite all of the media alarmists, the hurricane did not wreak havoc on Houston, but it did bring a lot of rain. Not something I am used to at all, but it only affected our going to and leaving the convention center. In fact, I didn't even know there WAS a hurricane, until there was some mention of it from fellow vendors.

The attendance was low at Quilt Market, so I'm counting on quilters everywhere to let their local quilt shops know about my new fabric line with Henry Glass, "A Prairie Journal". I'm so excited about this line, which was released at Fall Quilt Market in Houston.  It will ship in the summer of 2016, so please let your local quilt shops know you would like to see it in their shop! If you click on the image below, you can see the entire line, and the quilts I designed as free pattern downloads.

http://www.henryglassfabrics.com/collection/prairie-journal/
A PRAIRIE JOURNAL

In my market booth I was also displaying some of the projects that will be included in my new book that will be released in January, 2016, "Betsy's Scrapbag".

BETSY'S SCRAPBAG

I will be working like crazy the rest of the year to finalize the book.

The Quilts, Inc. organizers keep the Special Exhibit portion of the show open for an extra hour so that the vendors can enjoy the exhibits after hours, and not leave their booths unmanned.

An hour won't cover it all, so we had to edit what we could see, and my pick was the antique quilt exhibits. Only one of the exhibits allowed photography, so I'll share some of the photos here. These photos are from the Moda antique quilt exhibit:


The "quilt" above is made from paper postcards, very unique. 


We were on our way out, when this beautiful quilt caught my eye. It's newly made and one of the quilts juried into the Quilt Festival.


The quilt titled "Lady Indigo" was made by Carol Coffey Taylor and Martha Vincent of Beaumont, Texas, and is truly a beauty. The photo doesn't do it justice.

Of course, I had to go visit my quilt displayed in the Primitive and Folk Art Special Exhibit!

Annie's Scrapbook

I hope you've enjoyed the photos!

Until next time,

Martha

Thursday, September 10, 2015

Primitive Quilt and Folk Art Exhibit at International Quilt Festival Houston Fall 2015

I had a wonderful surprise in my mailbox this week.


Primitive Quilts and Projects Magazine (AKA Homespun Media) are the organizers of a new exhibit to be held next month at International Quilt Festival in Houston - Primitive Quilt and Folk Art Exhibit. They sent me this very thoughtful certificate and pin as a thank you for exhibiting my quilt, Annie's Scrapbook, in the upcoming show. And I LOVE the pin!


I can't wait to see all of the quilts and I will definitely be wearing my pin!

The letter that accompanied the certificate and pin says it all about the beauty and artistic merit of the Primitive and Folk Art style......


My prize for winning 3rd place in the exhibit was a whole roll of Warm Company batting 80/20.  I have already used it in my most recent quilt and I LOVE the way it looks! Thank you again, Warm Company and Primitive Quilts and Projects Magazine!


Until next time!

Martha
 

Monday, September 7, 2015

Day 7 Happy Birthday Jaftex 85th Anniversary Blog Hop and Giveaway!

Hello! I'm so glad you joined me today to help me celebrate the 85th Anniversary of Jaftex, the parent company to Henry Glass & Co., Studio e Fabrics, Blank Quilting, A.E. Nathan, and Fabric Editions. 


_________________________________________________________________________

I have had the good fortune to design fabric lines for both Studio e Fabrics, and Henry Glass & Co. As a designer for Henry Glass & Co., I was given the task of making a project for the blog hop using the Folio Basics line of fabric. I decided that a birthday celebration wouldn't be complete without a big Happy Birthday banner! So I put my thinking cap on and designed this banner using the yellow and red prints from the Folio Basics line, red rick rack, and Pellon  808 Craft Fuse Iron on interfacing.

HAPPY BIRTHDAY BANNER

A closer look:


For my free pattern for the Happy Birthday Banner CLICK HERE.

________________________________________________________________________

A little bit about Jaftex:

Jaftex Corp. was founded in the 1930’s when Jacob A. Fortunoff started selling fabric on the streets of New York. At that time, the mainstay of the business was women’s sleepwear and lingerie. In the 80’s, Jacob’s grandson, Robert, dramatically changed the business of the company. The business focus was transferred to the over the counter quilt industry when Robert purchased companies like A.E. Nathan, Henry Glass, Stylemaker, Chanteclaire, Fabric Editions/Studioe and more recently The Blank Quilting Corp. Robert is now joined by his two sons, Scott and Greg. Scott currently is the President of Studioe Fabrics, The Blank Quilting Corp. & A.E. Nathan Co., Inc. Greg just joined the business in late 2014 and has successfully spearheaded the company’s foray in to precut fabrics among other contributions.

______________________________________________________

And now for the contest! Look at these great prizes from Jaftex, Janome, Aurifil threads and Schmetz needles! Good luck!


85th Anniversary Giveaway


Please visit another designer on the blog hop today,
Heather @ Trends and Traditions  

and tomorrow
Linda @ Linda Lum DeBono


Jaftex 85th Anniversary Blog Hop participants:

September 1 - Kim Diehl guest posting @ American Patchwork & Quilting
September 2 - Pepper @ Pepper at the Quilt Studio 
September 3 - Anjeanette @ Anjeanette Klinder 
September 4 - Leanne @ The Whole Country Caboodle   
September 5 - Mark @ Mark Lipinski's Blog
September 6 - Heather @ Heather Kojan Quilts  
September 7 - Heather @ Trends and Traditions  
September 7 - Martha @ Wagons West Designs  
September 8 - Linda @ Linda Lum DeBono 
September 9 - Heidi @ Red Letter Quilts 
September 10 - Jill @ Jillily Studios  
September 10 - Dana @ My Lazy Daisy  
September 11 - Penny @ Sew Simple Designs  
September 12 - Ida @ Cowtown Quilts 
September 13 - Liz and Beth @ Lizzie B Cre8ive  
September 14 - Melissa @ Sew Bitter Sweet Designs
September 15 - Yvonne @ Quilting Jetgirl    
September 16 - Amy @ Kati Cupcake 
September 16 - Barbara @ QuiltSoup2 
September 17 - Erica @ Kitchen Table Quilting 
September 18 - Leona @ Leona's Quilting Adventure 
September 19 - Margot @ The Pattern Basket  
September 20 - Sylvia @ Flying Parrot Quilts   
September 21 - Lorna @ Sew Fresh Quilts  
September 22 - Kim @ Aurifil Threads  
September 23 - Rebekah @ Don't Call Me Becky   
September 24 - Julie @ The Crafty Quilter 
September 25 - Mary Ellen @ Little Quilts  
September 25 - Mary Jane @ Holly Hill Designs 
September 26 - Daisy @ Ants to Sugar
September 27 - Melissa @ Happy Quilting
September 29 - Jenny @ Martingale& Co.
September 30 - Teresa @ Third Floor Quilts
 

Monday, August 31, 2015

Jaftex 85th Birthday Celebration and blog hop


Jaftex is the parent company of Henry Glass & Co., Studio e Fabrics, and most recently Blank Quilting Corp. An exciting blog hop starts tomorrow to celebrate their 85th birthday! The co-sponsors of some wonderful prizes are Aurifil threads, Janome, and Schmetz Needles!

Please join me on September 7th for the blog hop and all of these wonderful designers working under the Jaftex umbrella!


September 1 - Kim Diehl guest posting @ American Patchwork & Quilting
September 2 - Pepper @ Pepper at the Quilt Studio 
September 3 - Anjeanette @ Anjeanette Klinder 
September 4 - Leanne @ The Whole Country Caboodle   
September 5 - Mark @ Mark Lipinski's Blog
September 6 - Heather @ Heather Kojan Quilts  
September 7 - Heather @ Trends and Traditions  
September 7 - Martha @ Wagons West Designs  
September 8 - Linda @ Linda Lum DeBono 
September 9 - Heidi @ Red Letter Quilts 
September 10 - Jill @ Jillily Studios  
September 10 - Dana @ My Lazy Daisy  
September 11 - Penny @ Sew Simple Designs  
September 12 - Ida @ Cowtown Quilts 
September 13 - Liz and Beth @ Lizzie B Cre8ive  
September 14 - Melissa @ Sew Bitter Sweet Designs
September 15 - Yvonne @ Quilting Jetgirl    
September 16 - Amy @ Kati Cupcake 
September 16 - Barbara @ QuiltSoup2 
September 17 - Erica @ Kitchen Table Quilting 
September 18 - Leona @ Leona's Quilting Adventure 
September 19 - Margot @ The Pattern Basket  
September 20 - Sylvia @ Flying Parrot Quilts   
September 21 - Lorna @ Sew Fresh Quilts  
September 22 - Kim @ Aurifil Threads  
September 23 - Rebekah @ Don't Call Me Becky   
September 24 - Julie @ The Crafty Quilter 
September 25 - Mary Ellen @ Little Quilts  
September 25 - Mary Jane @ Holly Hill Designs 
September 26 - Daisy @ Ants to Sugar
September 27 - Melissa @ Happy Quilting
September 28 - Janet @ One S1ster


Tuesday, August 11, 2015

Applique and Quarter Triangle Squares

Recently, I had the pleasure of working with fabrics from some upcoming fall Moda fabric collections, such as Alice's Scrapbag, Eliza's Indigo, Hawthorne Ridge, and more, some of which I incorporated into my new quilt. I can't unveil the entire quilt yet, but here is a portion of the pretty swag border:


Blocks made with "Quarter of a square" triangles, or quarter square triangles, for short, are also incorporated into the quilt, and here are a few blocks that didn't make their way into the quilt:


I think these blocks are so much fun to make (much more so than triangle squares, in my humble opinion), so I thought I would add this little tutorial on 2 different ways to make a 4 inch finished quarter square triangle block, just in case you haven't made one yourself yet.

METHOD 1


The first method will yield two finished 4 inch blocks. You will need 1 - 5 1/4" square in a light fabric, and 1 - 5 1/4" square in a darker fabric. On the lighter fabric, mark a diagonal line from corner to corner with a contrasting marking tool (in this case I used a pencil), and again from the opposite corner.


Place the squares right sides together, with the marked square on top. Stitch 1/4" away on both sides of ONE marked diagonal line as shown:


Next, cut apart on BOTH marked diagonal lines.


Open each unit and press seams towards darker triangle. You will now have four units. Arrange two units so that light and dark are opposite and place right sides together. Stitch a 1/4" seam along the long edge of triangles.


Press seam to one side. Pressing the seam open works, too.


METHOD 2


Here is a second way to make 4 inch finished quarter triangle squares. This method yields one block. I like this method for using 5 1/2" charm squares. The only drawback to this method is that the four sides of the finished block are on the bias. I wouldn't make a whole quilt using only blocks with bias edges, but incorporating a few here and there is fine, especially when those bias edges match up to an edge on the straight of grain.

You will need to cut 2 - 3 3/4" squares, one light and one darker (or to contrast). Place right sides together, and stitch a 1/4" seam on opposite sides of the square.


The gray 2610 Aurifil thread that I used to blend with scrap patchwork worked all too well for this photograph. Sorry!

Next, cut the sewn squares in half ONCE diagonally as shown:


There will be a small amount of thread on one end of each unit, but when you open the unit up, the thread will pull out very easily.


Just as a reminder, the edges on the square using this method, will all be on the bias, so carefully press the seams to one side. Place each unit right sides together, and sew a 1/4" seam along the long edge of triangle. Open, and press seam.

The block will be slightly larger than 4 1/2" unfinished, so using a ruler with a 45 degree angle marked as shown, match the 45 degree angle to the diagonal seams, and trim the block to 4 1/2".

Trim one corner  
 
Flip square around and trim the other corner


More beautiful blocks to add to my orphan block drawer!


Until next time!

Martha